


In this article we're going to have a look at my go-to architecture for consuming REST APIs in Android. I will describe the basic concept behind it, the components and the way they interact with each other. The aims of this architecture are:
Simplicity
Readability
Testability
Robustness
All the code discussed here comes from my Greenfield Template repo that I use as a starting point for new projects. It consists of a single screen app that consumes a JSON API from BBC to display the playlist for BBC Radio 1. It also has sample JUnit tests and UI tests.
Note: Since writing this article I have updated the repo to include an RxJava 2 implementation instead of the event bus. I created a branch for the code in this article though and updated all the links. Feel free to use whichever architecture you think is best for you.
Overview
Let's start by looking at a diagram detailing the flow of a data request from the moment the user interacts with the activity until the data is displayed.
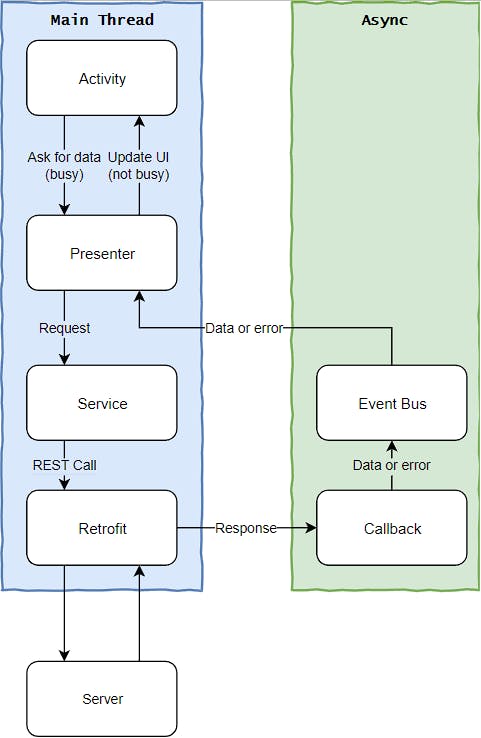
The flow of events and data:
The Activity reacts to the user input by informing the Presenter that data is required.
The Presenter fires off the appropriate request in the service layer (and instructs the Activity to display a busy indicator).
The Service then issues the correct REST call to the Retrofit layer (providing a callback).
The Retrofit layer exchanges HTTP requests and responses with the Server and then calls either the
onSuccessoronFailuremethod (as the case may be) on the provided Callback.The Callback posts the data or error on the Event Bus.
The Presenter (being subscribed the relevant data and errors on the Event Bus) receives the data or error and issues the correct commands to the Activity to update the UI (and dismiss the busy indicator).
The Activity presents the user with the data or error message.
The building blocks
Let's have a closer look at each of the components.
Activity and Presenter (MVP)
The Activity and Presenter play the role of the View and Presenter in the MVP architecture. Although you could certainly build the app without MVP by putting all the presenter logic inside the Activity, it would be hard to write local JUnit tests for it, because the activity class depends heavily on Android. Furthermore, MVP arguably the most popular paradigm for programming right now, so it should be familiar to other coders in your team, making communication easier.
In our implementation we have a base Presenter and a base View interface, with each package/screen having to implement a contract that extends these. Here is an example:
public interface Presenter {
    void start();
}
public interface View<T extends Presenter> {
    void showErrorMessage(String message);
    void showProgressDialog();
    void dismissProgressDialog();
}
public interface PlaylistContract {
    interface View extends io.zenandroid.greenfield.base.View<Presenter> {
        void displaySongs(List<Song> songs);
    }

    interface Presenter extends io.zenandroid.greenfield.base.Presenter {}
}
As an example implementation, you can look at PlaylistPresenter that implements PlaylistContract.Presenter and PlaylistActivity that implements PlaylistContract.View. Common pieces of functionality, such as showing and dismissing the progress dialog are implemented in the BaseActivity and BasePresenter classes.
Service layer and Callback
All interactions with the backend are done via the singleton service layer. The service is responsible for issuing the appropriate API calls (through Retrofit) and posting the results (whether they be data or errors) on the event bus. This architecture has the following advantages:
Allows for mock offline implementations for offline testing
Allows easy unit tests, as it is easy to mock using
MockitoAllows you to add caching later if so desired
Allows you to switch the entire backend if needed
Here is an example service class:
public class BBCServiceImpl implements BBCService{

    private final static String TAG = BBCServiceImpl.class.getSimpleName();

    private final BBCRadioApi bbcRadioApi;

    @Inject
    public BBCServiceImpl(BBCRadioApi api) {
        bbcRadioApi = api;
    }

    @Override
    public void fetchSongs() {
        bbcRadioApi.getPlaylistResponse().enqueue(new ApiCallback<>(PlaylistResponse.class));
    }
}
Much of the magic happens in the ApiCallback class:
public class ApiCallback<T> implements Callback<T> {

    private Class<? extends T> responseClass;

    private final Bus bus = Application.getBus();

    @Override
    public void onResponse(@NonNull Call<T> call, @NonNull Response<T> response) {
        EspressoIdlingResource.getInstance().decrement();
        if(response.isSuccessful()) {
            if(response.body() != null) {
                bus.post(processResult(response.body()));
            } else {
                bus.post(generateEmptyBodyResult());
            }
        } else {
            final String message = String.format(
                    Application.getInstance().getString(R.string.api_error_message),
                    response.code(),
                    response.message()
            );

            Log.e(TAG, message);
            bus.post(new ApiError(message, null, responseClass));
        }
    }

    @Override
    public void onFailure(@NonNull Call<T> call, @NonNull Throwable t) {
        EspressoIdlingResource.getInstance().decrement();
        Log.e(TAG, t.getMessage(), t);
        bus.post(new ApiError(Application.getInstance().getString(R.string.error_server_connection), t, responseClass));
    }
}
Note that if you are talking to more than one back-end, you should have a service class for each of them, so that they can potentially be mocked independently.
Retrofit (with OKHttp)
The de-facto standard in consuming REST APIs is Jake Wharton's excellent Retrofit library. By default it uses the OKHttp library to connect to the backend. The advantage of this library is the simplicity of defining the endpoints: you just write an interface with some special annotations the library generates code that connects to it.
public interface BBCRadioApi {

    @GET("playlist.json")
    Call<PlaylistResponse> getPlaylistResponse();
}
Singleton event bus (Otto)
The app uses a singleton event bus to publish responses from the service layer to the requesting class (usually the presenter). The same bus is used to publish exceptions that have been encountered when talking to the back-end. Great care should be taken not to abuse the event bus - you should never publish anything other than the API responses on it. In fact, only the service layer callbacks should post stuff on the bus.
For implementation I chose the Otto library (again by Jake Wharton) because, unlike its more popular counterpart EventBus it does not depend on Android hence you can do local JUnit tests with it.
Dagger 2
For dependency injection I chose to include Dagger 2. We have an app module with every global instance that needs to be injected (in our simple example, nothing much really) and we also have a separate module for each service class. In testing, we replace that service module with our own implementation that allows us to inject the mock service object instead of the real thing. We also use the same mechanism to replace the real implementation with an offline version of the service in the mock flavor of the app.
Here is the original module:
@Module
public class BBCServiceModule {

    @Provides
    BBCRadioApi provideBBCRadioApi() {
        return new Retrofit
                .Builder()
                .baseUrl(BuildConfig.BASE_URL)
                .addConverterFactory(GsonConverterFactory.create())
                .build()
                .create(BBCRadioApi.class);
    }

    @Provides
    BBCService provideBBCService(BBCServiceImpl bbcService) {
        return bbcService;
    }

}

@Component(modules={AppModule.class, BBCServiceModule.class})
public interface AppComponent {
    void inject(BaseActivity activity);
    void inject(PlaylistPresenter presenter);
}
And here is the mock implementation used in testing:
@Module
public class MockBBCServiceModule {

    private BBCService mockService;

    public MockBBCServiceModule(BBCService mockService) {
        this.mockService = mockService;
    }

    @Provides
    public BBCService provideBBCService() {
        return mockService;
    }
}

@Component(modules={AppModule.class, MockBBCServiceModule.class})
public interface TestingComponent extends AppComponent {
}
Note: While it is arguable if the extra complexity Dagger introduces is really worth it, it's quickly becoming a standard in the industry. It is definitely not mandatory and in fact can be easily replaced, for example by having a static
Injectorclass that handles all the injecting throughout the app.
Testing
In the Template repo I implemented two kinds of testing: local JUnit tests and instrumented "UI" tests. Let's have a look at each of them.
Local JUnit tests
For testing the Presenter logic I've decided to go with a local JUnit testing approach with Mockito. Although it is possible to do service layer tests as well, I decided against it since in the end you would only be testing retrofit and gson which have been already tested to death. In my experience it yields tests that never fail, which by definition is a waste of time.
Presenters of course sit between the View and the Service layers in the diagram above, and hence these are the two parts that we need to mock using Mockito. The view we can assert directly on, but for the Service we have to do some mental gymnastics to convince Dagger to inject our mock object instead of the real thing. These are described in the Dagger 2 section above.
Here is an example test:
public class PlaylistPresenterTest {

    @Mock PlaylistContract.View view;

    @Mock BBCService service;

    private PlaylistPresenter presenter;
    private PlaylistResponse response;

    @Before
    public void setup() {
        MockitoAnnotations.initMocks(this);
        Injector.setComponent(
                DaggerTestingComponent.builder().
                        mockBBCServiceModule(new MockBBCServiceModule(service)).build());
        Application.setBus(new Bus(ThreadEnforcer.ANY));
        presenter = new PlaylistPresenter(view);

        response = new PlaylistResponse();
    }

    @Test
    public void testSongsAreLoaded() {
        presenter.start();

        verify(view).showProgressDialog();
        verify(service).fetchSongs();

        Application.getBus().post(response);
        verify(view).displaySongs(response.getPlaylist().getSongs());
        verify(view).dismissProgressDialog();

        verifyNoMoreInteractions(view);
        verifyNoMoreInteractions(service);
    }

    @Test
    public void testApiErrorIsHandled() {
        presenter.start();

        verify(view).showProgressDialog();
        verify(service).fetchSongs();

        final ApiError error = new ApiError("Test message", new Exception(), PlaylistResponse.class);
        Application.getBus().post(error);
        verify(view).dismissProgressDialog();
        verify(view).showErrorMessage(error.getMessage());

        verifyNoMoreInteractions(view);
        verifyNoMoreInteractions(service);
    }
}
UI tests
For more comprehensive end-to-end testing I have included the ability to run UI tests with Espresso. These can by fired off by the CI environment on an emulator or even an actual device to check that basic functionality is not broken by the new commit.
These work pretty much as expected, with the notable exception that Espresso and Retrofit do not play nicely together. In particular, Espresso does not know when Retrofit finishes a request. This is of course a known issue, but it requires a solution nevertheless.
As a workaround, I have decided to use an idea I first encountered in Google's Sample Architecture for Android repo, which is to use an Espresso IdlingResource object as a semaphore. That is to say when I fire off a request, we increment the internal counter of the resource and when we finish one we decrement it. If the counter is not 0 then it means we're busy. The code is in EspressoIdlingResource.java.
Note that this means we have to modify production code to call EspressoIdlingResource.increment() and EspressoIdlingResource.decrement(), which is generally frowned upon. Luckily, in our architecture the calls are limited to the callback class and I think the tradeoff is worth it.
You can view an example test at PlaylistActivityTest.java.
Note: The UI tests in the sample implementation are meant to be run offline (using the mock flavor).
Conclusion
In this article we've looked at my go-to architecture for consuming REST services in an Android app. We've seen how the flow of the events and data works and what the major components are. We've also explored the testing options can be implemented and how to work around some of the incompatibilities between the libraries.
Don't forget that the code for the sample app is available in my Greenfield Template repo.