In the second part of this series of articles on the Android Things platforms we're going to continue where we left off in the previous article and get our hands dirty and write a simple program to control the state of a LED and publish its status in the cloud using the Firebase Database. Finally, we're going to implement the ability for the LED to be toggled remotely by changing an entry in the Firebase Console. The code is available in this repo.
The software requirements
Android Things apps use the same structure as those designed for phones and tablets. You will need to have the following installed:
Android Studio
Android SDK 7 (API 24) or newer
Android tools 24 or newer
Creating the project
In Android Studio, choose File -> New -> Project, name it and give it a base package. Choose phone and tablet as your platform and make sure you target API 24 or newer. Don't auto generate any activity.
Then, go into build.gradle and instruct Android to expect the Things API to be present on the device:
dependencies {
    ...
    provided 'com.google.android.things:androidthings:0.1-devpreview'
}
Note: provided means the library is present on the device and should not be compiled into the apk.
Next, add the things shared library entry to your app's manifest file:
<application ...>
  <uses-library android:name="com.google.android.things"/>
  ...
</application>
The last step is to declare a home Activity. The concept of an activity should be familiar to Android developers. It offers lifecycle management and the ability to provide an (optional) UI to the user. Unlike the phone and tablets though, in Android Things you must have a single entry point Activity. You specify this activity by creating an intent filter in the AndroidManifest.xml file with the following parameters:
Action: ACTION_MAIN
Category: CATEGORY_DEFAULT
Category: IOT_LAUNCHER
For ease of development, this same activity should include a CATEGORY_LAUNCHER intent filter so Android Studio can launch it as the default activity when deploying or debugging.
At this point, the Android Manifest should look something like:
<application
    android:label="@string/app_name">
    <uses-library android:name="com.google.android.things"/>
    <activity android:name=".HomeActivity">
        <!-- Launch activity as default from Android Studio -->
        <intent-filter>
            <action android:name="android.intent.action.MAIN"/>
            <category android:name="android.intent.category.LAUNCHER"/>
        </intent-filter>

        <!-- Launch activity automatically on boot -->
        <intent-filter>
            <action android:name="android.intent.action.MAIN"/>
            <category android:name="android.intent.category.IOT_LAUNCHER"/>
            <category android:name="android.intent.category.DEFAULT"/>
        </intent-filter>
    </activity>
</application>
Accessing peripherals
In order to control the LED, we're going to use the basic Peripheral I/O APIs to discover and communicate with General Purpose Input Ouput (GPIO) ports.
The system service responsible for managing peripheral connections is the PeripheralManagerService. You can use this service to list the available ports for all known peripheral types.
The following code writes the list of available GPIO ports to logcat:
public class HomeActivity extends Activity {
    private static final String TAG = "HomeActivity";

    @Override
    protected void onCreate(Bundle savedInstanceState) {
        super.onCreate(savedInstanceState);

        PeripheralManagerService service = new PeripheralManagerService();
        Log.d(TAG, "Available GPIO: " + service.getGpioList());
    }
}
Let's run the application by pressing Run in Android Studio. If you are connected to your Raspberry Pi, you should be able to select it as you would an emulator or a phone connected to your development machine. After a few moments, the following output should appear in your logcat:
D/HomeActivity: Available GPIO: [BCM12, BCM13, BCM16, BCM17, BCM18, BCM19, BCM20, BCM21, BCM22, BCM23, BCM24, BCM25, BCM26, BCM27, BCM4, BCM5, BCM6]
Toggling the LED
In order to toggle the LED on or off we have to get hold of the appropriate GPIO object from the list that is outputted in the previous step. The proper GPIO depends on which physical pins you used to connect the LED to. The Raspberry Pi pinout details which GPIO object we need. For example, BCM4 corresponds to pin 7 while BCM17 controlls pin 11.
Note: The rest of this post assumes that the LED is connected between 6 (or another ground pin) and 7 (which corresponds to BCM4)
public class HomeActivity extends Activity {
    private static final String TAG = "HomeActivity";
    private static final String GPIO_PIN_NAME = "BCM4";

    private Gpio mLedGpio;

    @Override
    protected void onCreate(Bundle savedInstanceState) {
        super.onCreate(savedInstanceState);

        PeripheralManagerService service = new PeripheralManagerService();

        try {
            mLedGpio = service.openGpio(GPIO_PIN_NAME);
            mLedGpio.setDirection(Gpio.DIRECTION_OUT_INITIALLY_LOW);
        } catch (IOException e) {
            Log.e(TAG, "Error on PeripheralIO API", e);
        }
    }
...
}
Once the appropriate object is identified we can read or set the state of the pin (and hence the LED) with the following code:
    private void setLed(boolean newState) {
        try {
            mLedGpio.setValue(newState);
        } catch (IOException e) {
            Log.e(TAG, "Error on PeripheralIO API", e);
        }
    }

    private boolean getLed() {
        try {
            return mLedGpio.getValue();
        } catch (IOException e) {
            Log.e(TAG, "Error on PeripheralIO API", e);
        }
        return false;
    }
Closing the GPIO object is done on the onDestroy() lifecycle method:
    @Override
    protected void onDestroy() {
        super.onDestroy();

        if (mLedGpio != null) {
            try {
                mLedGpio.close();
            } catch (IOException e) {
                Log.e(TAG, "Error on PeripheralIO API", e);
            }
        }
    }
Test it out by adding setLed(true); at the end of the onCreate() method and running the app again. The LED should turn on.
Bringing in Firebase
Now that we are able to control the led we will add Firebase Database capabilities to the app and use them to publish the LED's state on the cloud. To enable Firebase Realtime Database for our project:
Install the Firebase Android SDK into your app project. The simplest way is to click Tools > Firebase to open the Assistant window, select Database and follow the wizard.
In the Firebase console, select Import Google Project to import the Google Cloud project you created using the Assistant into Firebase.
Download and install the
google-services.jsonfile as described in the instructions.Add the Firebase Realtime Database dependency to your app-level
build.gradlefile:
dependencies {
    ...

    compile 'com.google.firebase:firebase-core:9.6.1'
    compile 'com.google.firebase:firebase-database:9.6.1'
}
You now need to specify who can read and write to your Firebase Realtime Database. To configure your Firebase database access rules:
In the Firebase console, on the page for your project, click Database.
Click Rules, and update the database rules to allow public read/write access:
{ "rules": { ".read": true, ".write": true } }
Click Publish.
Note: For more information on setting database rules, see Getting Started with Database Rules.
Generating a device ID
We will generate a UUID unique identifier for each device we deploy the app to. This UUID will be saved in the SharedPreferences and reused on subsequent launches. Add the following to HomeActivity:
    private static final String UUID_KEY = "_UUID";
    private static final String PREFS_NAME = "MyPrefs";

    private String getDeviceId() {
        SharedPreferences prefs = getSharedPreferences(PREFS_NAME, 0);
        if(!prefs.contains(UUID_KEY)) {
            prefs.edit().putString(UUID_KEY, UUID.randomUUID().toString()).apply();
        }
        return prefs.getString(UUID_KEY, UUID.randomUUID().toString());
    }
Database structure
Firebase is a non-relational database, in which data is represented in a tree structure. For this application, we will have the following structure:
 _root_
    - deviceID1
      + currentStatus
          * ledOn _(boolean)_
      + desiredStatus
          * ledOn _(boolean)_
    - deviceID2
      + currentStatus
          * ledOn _(boolean)_
      + desiredStatus
          * ledOn _(boolean)_
Publishing the status
We will now add code that saves the current status of LED in the Firebase database. This is the object we will be saving:
public class Status {
    private boolean ledOn;

    public boolean isLedOn() {
        return ledOn;
    }

    public void setLedOn(boolean ledOn) {
        this.ledOn = ledOn;
    }

}
And the code to save the status:
public class HomeActivity extends Activity {
//...
    private Status mStatus = new Status();
    private DatabaseReference mCurrentStatusRef;
    private DatabaseReference mDesiredStatusRef;

    @Override
    protected void onCreate(Bundle savedInstanceState) {
        super.onCreate(savedInstanceState);

//...
        FirebaseDatabase database = FirebaseDatabase.getInstance();
        mCurrentStatusRef = database.getReference(getDeviceId()).child("currentStatus");

        mStatus.setLedOn(getLed());
        mCurrentStatusRef.setValue(mStatus);
    }

// ...
}
Also modify the setLed() method to now update the database:
    private void setLed(boolean newState) {
        try {
            mLedGpio.setValue(newState);
        } catch (IOException e) {
            Log.e(TAG, "Error on PeripheralIO API", e);
        }
        mStatus.setLedOn(newState);
        mCurrentStatusRef.setValue(mStatus);
    }
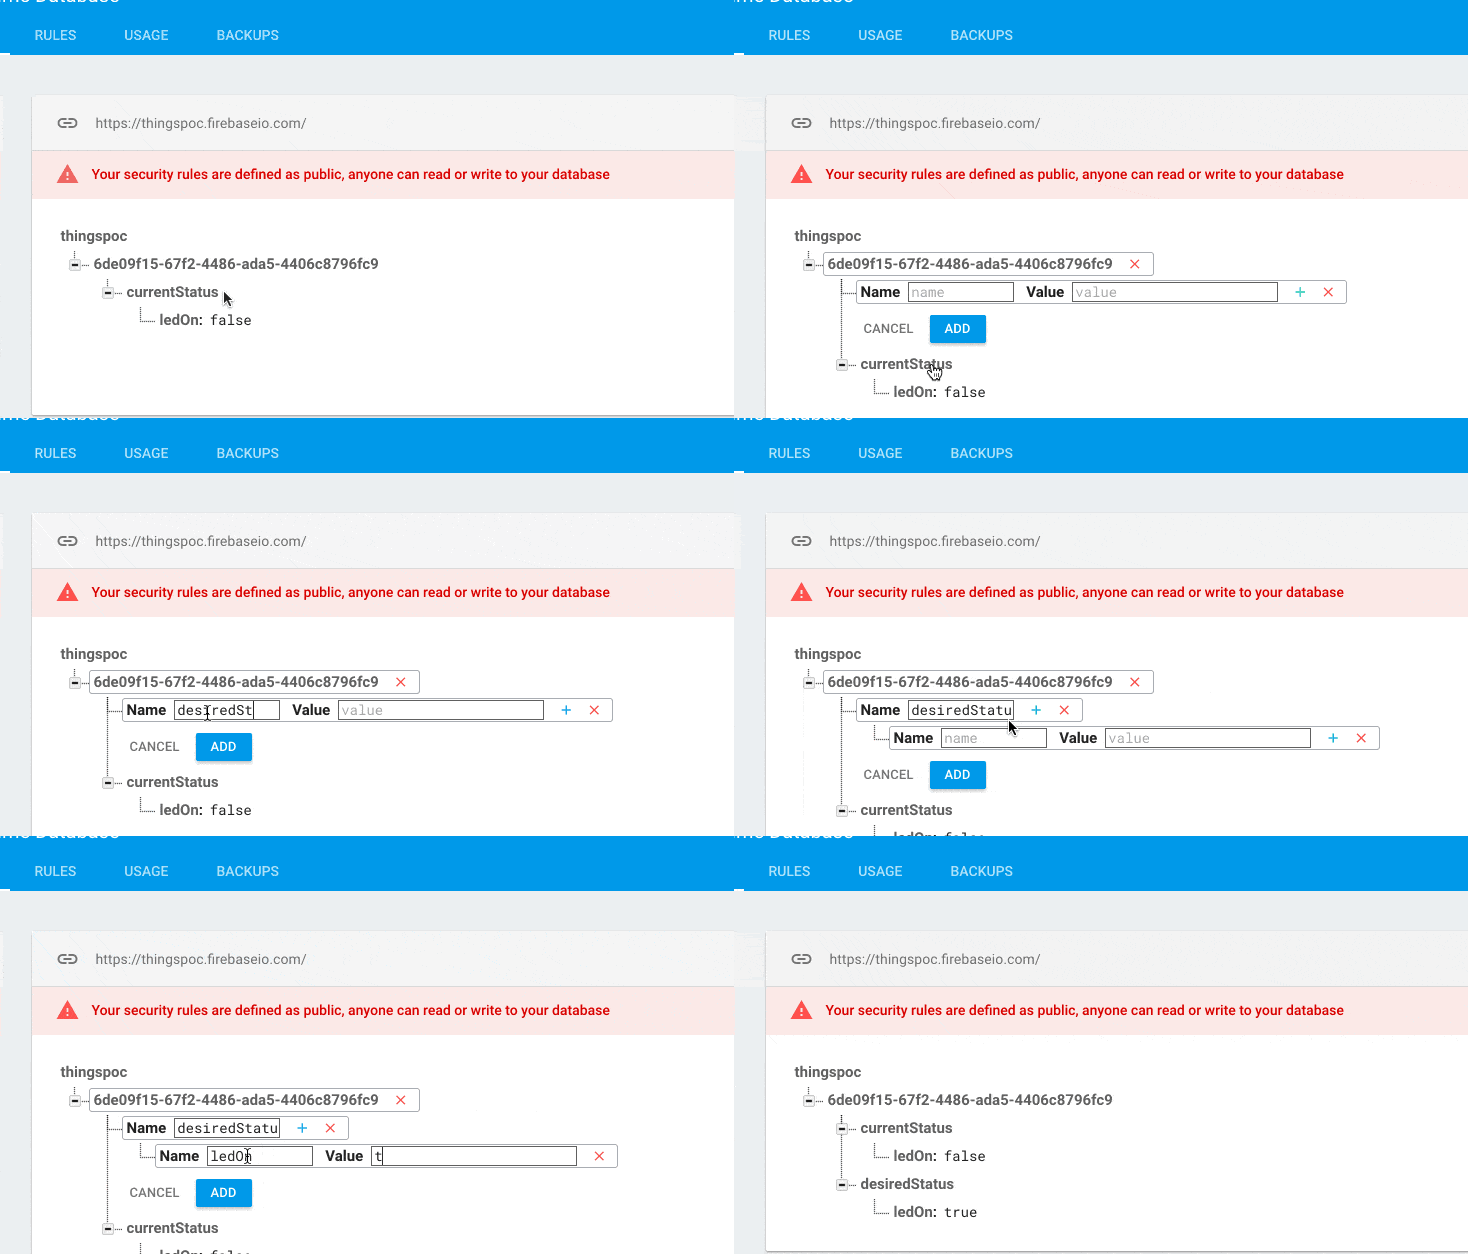
Run the project. You should now see the data in the Firebase console:

Remotely toggling the LED state
Now that we can publish the status of the LED we want to be able to listen to requests to toggle the status of the led. We do this by associating a new status object with each device called desiredState. Whenever we discover such an object exist we apply it and then delete it from the database.
    @Override
    protected void onCreate(Bundle savedInstanceState) {
//...
         mDesiredStatusRef = database.getReference(getDeviceId()).child("desiredStatus");
        mDesiredStatusRef.addValueEventListener(new ValueEventListener() {
            @Override
            public void onDataChange(DataSnapshot dataSnapshot) {
                if(dataSnapshot.getValue() == null) {
                    return;
                }
                mDesiredStatusRef.removeValue();
                handleNewState(dataSnapshot.getValue(Status.class));
            }

            @Override
            public void onCancelled(DatabaseError databaseError) {
                Log.e(TAG, "Error on Firebase read", databaseError.toException());
            }
        });
    }

    private void handleNewState(Status desiredStatus) {
        setLed(desiredStatus.isLedOn());
    }

}
To test this, you can go to the Firebase console and create a desiredStatus object with the desired ledOn value. The app should pick it up, update the LED, update the database currentStatus and delete the desiredStatus object almost instantly:

Conclusion
In this article we've achieved two goals:
we've used the GPIO API to control and query the state of a LED
we've connected to the Firebase Database and registered the status of the device as well as responded to the change requests.
The third (and last part) of this article covers how to create a companion app that acts as a remote control for our thing.
